May 25, 2011

OO IS Great But...

OO as in Olive Oil is great to use for sauteing
but for the warmer months when you want to
look your slimmest.... try sauteing your veggies
in vegetable or chicken broth and then you can
toss a teaspoon of OO after they are cooked
if you'd like!   

May 19, 2011

Orange Wedges Like You've Never Seen

So everyone has had orange wedges, especially if you've played
a team sport as a kid and there's  always that one mom who takes
the time to bring orange wedges. But!... have you ever put jello
in orange wedges? Probably not! Cultivate your orange skins and jello.


You want oranges that are on the smaller side.
Ones that will fit in your muffin tins.
Cut your oranges in half and juice the oranges.
Another bonus- fresh squeezed orange juice!

After you've got all the juice out of the oranges-
you want to place each half in muffin tins.
And pour some gelatin/jello mix and place it in the
refrigerator like you normally would for making  jello/gelatin.
Once the gelatin has hardened- you slice it like oranges.
The tip with this is to not make the jello too watery.
You want it a little firmer than the norm.
You can also have so much fun with it by adding different
flavors/colors. It's really pretty and a great presentation.
You will have so much fun eating it-
there is a chance you might get giddy.


Home-Made Bagels

If you live in America... you can almost get a bagel
anytime of the day- but if you are living somewhere
where they only have frozen ones to serve or they don't
know what a bagel even is....  maybe try this recipe.

Or just try it for fun. You can then say... you know how to
make bagels. Probably not something that will go on your
resume but, none the less- it can be interesting.

Ingredients:
1 cup of WARM water
1 packet of active dry yeast (1/4 ounce)
1.5 TBS granulated sugar or substitute Splenda
about 3 cups of all purpose flour (or multi-grain)
1 tsp salt
1 tsp vegetable oil

Procedure:
Combine the water, yeast and sugar and mix together.
(if you have a mixer that can mix dough... now is the time
to use it) if not- just use the force of your arm.

Gradually add in 1/2 the flour, salt and keep mixing
everything together. Continue to add the rest of the flour
gradually as you knead the dough with your hands.
Knead it on a cutting board with the board being lightly
floured to prevent the dough from sticking.
Once the dough is not sticky- you want to get a large bowl
and add the oil. Place the dough in the oil,
turning the dough so it gets coated in the oil.
You then need to cover it with plastic wrap and
let in sit for one hour. After the dough has been in time
out for one hour it will have practically doubled.
Take the dough out, and divide it into pieces.
(this recipe should be good for about 6 bagels)


It is easier if you make the dough into a ball, flatten it and then
pull a piece out for the center in the center- rather than making
a long piece and then joining the ends.  Pull in from the middle!

Preheat the oven for 400 degrees.
Grease a baking sheet with a little oil.
(It makes sense to make 6 little blobs of oil where you think the
dough will sit on your pan-rather than coating the entire
pan with oil) In a big pot, boil some water (enough for the
bagels to be to be covered and then some.)
Add a TBS of sugar into the boiling water (optional)
Carefully drop your dough into the boiling
water for 30-45 SECONDS...  no more than a minute.
Then, take it out of the water and place it onto the prepared pan
that will go into the oven. Bake the first side of the dough
for about 5 minutes. Turn the bagel over and bake the 2nd side
for about 30 minutes. Remove from the oven and let it cool
on a wire rack. There you have it... a home-made bagel.


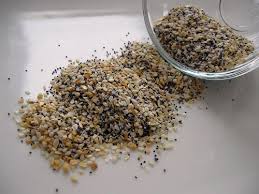
If you enjoy everything bagels-  you can always take some sea-salt,
toasted onion flakes, poppy seeds, toasted sesame seeds and of course
garlic and put it onto the bagel right before you pop them into the oven.

May 14, 2011

Yakitori

Yakitori is a common street food found in Japan.
Yakitori literally translates to "grilled bird" so
 it is traditionally made of chicken. no surprise.


Chicken Yakitori can be made simply by cutting strips of chicken and
marinating it in a teriyaki sauce. You can use your favorite bottled
teriyaki sauce or make your own simply by adding the ingredients below.

Ingredients:
about 1/2 cup soy sauce
1/2 cup chicken broth
1/4 cup or to your liking of sweetener (Agave nectar, Splenda, Sugar)
4 gloves of garlic mashed up
minced up ginger (about a tsp or so)
splash or (1 tsp sesame oil) toasted sesame oil is best for this recipe
mix these ingredients and heat it on the stove until it starts to boil.

Combine in a little bowl/cup equal parts of warm water
and cornstarch about 1 TBS and add the combined mixture
of corn starch and water into the sauce as a thickener.

Before you brush this sauce on your raw chicken....
save some sauce for dipping in a clean separate container.
You NEVER want to use sauce that has touched raw chicken
EVER EVER NEVER EVER.

You can throw the cut chicken into the the sauce
and then skewer the Yakitori with 2-3 inch pieces of
cut scallions in between the chicken pieces.
Don't forget to soak your skewers if you are using wooden ones.
It can be helpful to use 2 skewers per Yakitori stick for
extra support for the chicken pieces depending on the
size and to prevent spinning when you turn the chicken
over on your grill. You can also put these in the oven as well.
I recommend putting them on broil. Make sure you leave
the oven door propped (you know how your oven door
has a stop...maybe 3-5 inches or so and stays open all by itself)
It's for the purpose of the room temperature air circulating
into the oven on that high broil setting. If you have an oven
that has a "convection" setting forget everything about
leaving the oven door open.

May 13, 2011

Frying Pans vs. Saute Pans

So is there a difference between a frying pan and
a saute pan or just what you cook and how you cook it
the name of the pan? hmmm.

There actually is a difference. A saute pan is a pan that is typically
wider with straight sides that are a bit taller (typically 3 inches)
and a bottom that is completely flat.
And a frying pan looks more like this-

The reason for the saute pan having straight sides and the 
frying pan having slightly curved sides is for the purpose 
of the pan.  Frying pans  have curved/sloped sides so that s
team doesn't collect in the pan. Saute pans are used more for 
making sauces and reductions. But, there is no rule where you 
can't use one versus the other especially in your own kitchen.  
You are the boss of your kitchen!

Woven Bacon... Baskets?

Bacon is considered a vegetable to some.
Bacon is good for breakfast but also good for a burger with
a little BBQ sauce and a good slice of cheese. Pepper Jack,
Provolone, any kind of cheese is good.

You can actually take bacon and weave it almost like a basket.
Who knew!?  You can cut 2 strips in half and make a small single
weave or go as large as you want. But the small, mini weave
works great for burgers rather than the 2 longer strips.
I have always had trouble enjoying the bacon in a burger when
it is 2 long strips randomly inside a burger that is round shaped.

Did you know bacon could be cultivated into a basket making craft?


Brownie Cuts

Who doesn't love a good, yummy, chocolatey, fudgy brownie?
Sometimes when they are slightly gooey it is a little hard to cut
them- as they stick to your knife and start to break apart.
I've found out that if you use a plastic knife- the brownies don't
stick to the disposable, plastic knife and it glides perfectly.
No more lumpy weird shaped brownies!  woohoo.