October 25, 2016

Mirror, Mirror on the wall, who's the tastiest of them all..!?!

Mirror, Mirror on the wall, who's the tastiest of them all..

Have you ever wanted to try a taste test to truly see either
which brand or type is better OR to see what your palate
is telling you?  Believe it or not- a large portion of our eating
is done with our other senses.  Our scent as we tend to smell
the food and of course visually with our eyes.
Not always, but more often than not- our palate tells
us something that we might of thought differently.

In our household- we make it a fun mini event by choosing an item
and then getting several of them made by popular brands.

This time around it happened to be dark chocolate.
The brands chosen were:
Hershey, Ghiradelli, Lindt, Godiva, Dove and a random gourmet brand.


2 were waaaay too sweet, 1 was hard to finish... chocolate=hard to finish?
What planet are we on right?   2 were just shy from winning 1st place.
There was a clear winner that was rich, creamy, intense but not
overwhelming intense and just... really good.


hmmm.  are you wondering who won!?
You should take my taste testing class coming up and you'll be able
to taste test over a dozen different things to see which brand is
better according to your taste buds!  cheeses, beverages, yogurts,
different brands of many different things.


which will your palate choose, Let's Cultivate Food


October 20, 2016

We're ROOTING for you!

cut 2 inches,  place in 1 inch of water,  1 week to soil


Let's Cultivate Food is 'ROOTING' for you!
Did you know that you can take any vegetable and chop 
the root end portion - 2-3 inches of it, 
soak the cut portion in a bowl or container of water 
and it will start to grow again..?  
Typically you will see some new growth as early as 4-5 days. 
(some veggies will take a tad bit longer)  
If you have outdoor space or a pot with soil indoors... 
you can move your new veggie plant within 7-10 days.   
'Lettuce Turnip the Beet!' ...........Oh KALE yeah!  


October 19, 2016

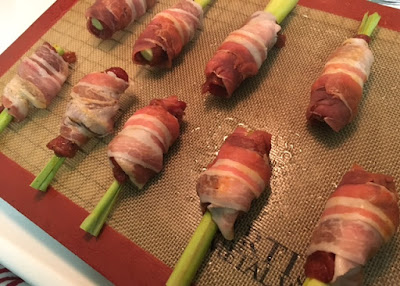
Bacon wrapped beef lemongrass lollipops!

What's that movie where they say that things are always better on a stick?
I certainly agree but let's use something that will give us a little flavor
rather than a wooden stick. Lemongrass in this case.
I tend to joke and say that lemongrass is organic fruit loops
during my cooking classes. If you've never had anything with lemongrass-
you don't know what you're missing!


For these bacon wrapped beef lemongrass lollipops- you will need:
lemongrass stalks (usually comes 3 to a bunch) you can cut each stalk  to about 
3 inches getting 3 to a stalk.  So approximately 9 lollipops for  3 stalks.  


For the beef, I used flank steak (about 1 pound) and sliced it into thin slices.
I then marinaded the flank beef slices in:
5 TBSP of soy sauce
1 heaping TBSP of hot pepper paste
1 teaspoon of a sugar (or your choice of sweetener) 
(a grated apple or pear is good too!)
2 TBSP of sesame oil
mix with the flank steak and let it sit for a minimum of 20 minutes.

Then you want to make a sweet chili glaze.
~ 3 heaping TBSP of apricot jelly
~ 1 teaspoon of hot pepper seeds ( to your liking of spiciness)
~ juice of an orange
~ 1 TBSP of rice vinegar


Turn your oven on now to 400 degrees.

Time to wrap or roll.  Whatever you want to call it is  okay!
Take your slices of beef and wrap around the top half of the lemongrass  'stick'
(about 2 -3 slices of flank steak slices per lollipop)
Then wrap a piece of bacon (thinly cut preferred) around the beef.

Let it bake in the center of your oven for about 15 minutes.
You will see the bacon turn more brown.
After 15 minutes, turn your oven to broil, 
take the sweet chili glaze and brush it on the bacon portion.
Move your pan or sheet (whatever you laid your lollipops on)
to the top shelf right under the broiler.
You want to prop the oven door open at this time...  
you know so the room temperature
air flows through for circulation and doesn't dry out the food. 
Once the bacon browns and almost gets a slight char- they are done.
about 7 minutes after you place it on broil.


Just ROLL with it!   Let's Cultivate Food

July 6, 2016

Gluten free pizza bites!

Whether you are on a special diet or you are trying to fit into that
special swim suit or you just feel like eating a little less carbs
and eating healthy veggies...

these gluten free all veggie pizza bites on a bed of
mashed cauliflower and sauteed kale smothered in cheese
will make meat lovers enjoy them too.


Start by chopping the kale into bite sizes...
During our Cooking Classes throughout greater Philadelphia-
people ask me tons and tons of questions and some recent questions
about kale have been if you need to massage the kale prior to cooking.

Hmm... should you 'massage' the kale or not...
why should you and if so- does it make a difference?

As far as this dish-  after you have your Kale ready-
saute with a little olive oil and coarse sea salt for about 4-5 minutes.

For the mashed cauliflower:
you want to cut the cauliflower florets into bite sizes-
simply so it's easier to mash once you boil them in about 1 inch
of salted (1 teaspoon)  of water. (Mash them with a masher
once they have softened in your pot.) (about 10-12 minutes)
(drain the water prior to mashing)
You don't need any extra seasonings due to the boiling in salt water
unless you want to add a little butter or olive oil.

Now for the pizza bites!
Take some Chinese eggplant (because they are long and skinny)
for bite sizes- these work best.
Slice them and saute them on both sides with olive oil.
(about 2 minutes each side)
You can transfer them to the oven right away but I like to take
a short cut and just add a little tomato sauce and shredded
cheese (of your liking) I mixed mozzarella, cheddar and
a little Parmesan cheese right on the eggplant in the saute pan--
I then put the lid on my saute pan so the cheese melts in the heat
from the pan that just sauteed the eggplant slices.

Once the cheese has melted- put your oven onto the broil setting
and place your saute pan on the top rack right under the broiler grates.

When you cheese has slightly browned- they are ready to plate
and eat!  


'Lettuce Turnip the Beet Let's Cultivate Food

May 26, 2016

Cucumber Kimchi

Oh-ee  "Oh-Eee" which is cucumber in Korean..... kimchi.
Basically it is cucumbers  stuffed with similar ingredients
that go into Kimchi- (the spicy fermented Korean cabbage.)

First, you want to start off with some Kirby cucumbers.
Kirbys are good b/c they are smaller than the regular
long cucumbers and there aren't as many seeds.


After washing them, you want to cut 2 slits almost all the way down 
the cucumber. You want 4 pieces and the cucumber still in tact 
because you will be stuffing the Kirbys. 
--cut all the way down leaving about an inch--- something like this.


You want to take the cucumbers, put them into a large bowl
and add some coarse salt, with a little water-
to soften and more or less infuse the cucumbers a little.


After roughly 20-30 minutes, rinse the salt off with water.

You'll need some cut chives,  hot pepper flakes
(not the seeded type of pepper flakes), shredded carrots,
a tablespoon of fish sauce
or soy sauce and some minced garlic. (2-3 cloves or to your liking)


What's great about certain Asian-style knives is that they are flat
on the bottom end of the knife. You might think.. 
who cares what the bottom looks like?  They are great because 
after you smash garlic cloves with the side of your knife...
you can just mince the garlic with the bottom of your knife.  
Yes, double-duty!


The stuffing of the cucumbers is a simple mixture of shredded carrots 
(pretty much for the color and to add a little natural sweetness), 
the cut chives into about 2 inch pieces,  
1 tablespoon of fish oil 
2-3 minced garlic cloves and 
hot pepper flakes to your liking of spiciness.


'Chop it like it's hot' Let's Cultivate Food

May 23, 2016

Pre-packaged meals delivered...


Pre-packaged meals in bento-style boxes are becoming more
and more popular these days with everyone
having busy schedules with work AND just every day life.

Luckily... Let's Cultivate Food can assist in providing
healthy and nutritious meals for anyone.
Whether it's a family member, friend or co-worker
who is feeling under the weather,
who is recovering from surgery,
who just doesn't have the time to cook,
or just doesn't know how to or feel like cooking.

We use as much organic ingredients as possible
and when available.  The boxes are coated in wax
for easy re-heating and storing in the refrigerator.

The boxes are made from 100% recycled materials.
Prepared meals are large portioned meals
and are $13 per box.  They are filled with a protein
and hearty vegetables.  We cater to ALL special diets.


Below are just a few pictures of  today's
bento-style meals ready to go.


Click  'to BOOK'  to schedule your first food delivery of prepared meals!


'Lettuce Turnip the Beet Let's Cultivate Food

April 23, 2016

Crab Rangoons

Crab Rangoons kinda night!?


The recipe is below.
8 oz of cream cheese (softened)
4 oz of imitation crab meat
2 scallions
1 clove of garlic minced fine
1 teas of Worchestershire sauce
1 teas of soy sauce
1 teas of sugar

for the sauce:
1/2 cup of dijon mustard
1/4 of rice vinegar
1/4 of warm or hot water (not boiling)
1 TBSP of sweetener
1 teas of sesame oil

Once your cream cheese is softened
(you can just leave it on your kitchen counter for 15-20 min.)
fold in the rest of the ingredients
and fold into your favorite shape with wonton wrappers.
Deep fry on medium high heat until the wrapper is golden.


Whip it good Let's Cultivate Food

April 3, 2016

Chicken Coconut Curry

Curry is a favorited comfort food for many.
Curry is common in many south Asian countries.

A very easy go to curry dish I like to show people
how to make is coconut curry.
You can use Masaman curry which is a medium spice level.
You can also use green curry and if your palate is
craving a spicy kick- you can use red curry paste as well.

I would use 1 heaping teaspoon of either curry paste that
you prefer and add to your liking little by little.


below is a basic recipe you can start with and then add to your liking.

Coconut curry with chicken
3/4 - 1 can of coconut cream
1 heaping teaspoon of Masaman curry 
1 chicken breast cut into cubes or chicken thighs
2 large potatoes cut into 1 inch cubes
1 head of cauliflower florets (about 1 inch)
3 cloves of garlic minced up or sliced (to your liking)
1 inch of ginger grated
1-2 onions diced small

It's best to cook for 45 minutes to an hour. 
The longer the better as everything with
infuse together.  Curry is best eaten on a bed of
Basmati rice (with celery seed) or coconut rice.  

For a topping or garnish- you can place thin slices 
of red bell pepper and scallions sliced thin.


Chop It Like It's Hot Let's Cultivate Food

January 21, 2016

How to tell if your eggs are fresh.

When did you buy your eggs?  Last weekend or the weekend before?
All egg cartons have a sell by date on the side of the carton aka an
expiration date.  You definitely want to look at that sell by date
BUT more importantly-  you want to look at the number above.
Look at the egg carton I purchased this morning.
(Today's date is January 21st, 2016)


The number above the month (FEB) in this case is "005".  
This number indicates that these eggs were packaged on January 5th.  
The number goes all the way up to... 365.  Yup, you guessed correctly! 
The number of days that are in a single year.  The eggs NEXT to these eggs 
(not pictured)  were on sale for 2 dozen eggs for $3.00.
The number on the eggs on sale were 360 meaning they were packaged
on December 26th, 2015.  Yikes!  Those 360 numbered eggs are pretty old.
Keep in mind that prior to packaging more often than not eggs 
are also stored up to one week.  As long as eggs are stored in 
temperatures of 33-40 degrees when raw- they will be ok.

The consecutive dates of the year from 1-365 on egg cartons are called 
the Julian Date. Don't worry if your Julian Date is 20 days over or even 25 days. 
 As long as fresh shelled eggs that are raw are stored in appropriate 
temperatures-  most eggs are ok  4-5 weeks beyond the Julian date.

So then what's the point of the expiration date then... you ask!?
Again, as long as un-cooked eggs are stored in temperatures up to 
40-45 degrees they are good but as the expiration date gets closer-
the egg will lose some quality ie: if you are baking-
the cake might not rise as high as expected or the whipped consistency 
in  a meringue might not be as fluffy etc. You get the idea.

Always read labels in your food.  You can eat healthy and fresher
sometimes simply just by looking at parts of a label or stamping.


Whip it Good Let's Cultivate Food