December 19, 2012

Penguins APP

When I say I like to create food that is not the norm....
I'm not kidding!  I love to take food and create it in ways
that make it look almost like art!  With that... here are some penguins!
Lately, EVERYTHING is holiday and winter related.

Now, here is a REALLY simply appetizer that will WOW your friends
and family.  I just call them penguin apps.

All you need are toothpicks, carrot slices, black olives, cream cheese
and little sliver cut pieces of carrot  for the penguins mouths/beaks.
A pairing knife will totally come in handy for making this appetizer!


Zestfully, Let's Cultivate Food


December 18, 2012

Super EASY Festive Donuts


Pinning is my drug... I mean.... where lots of ideas are shared. I came across these cute festive
diy donuts and had to make these!  Who doesn't love donuts? These are ridiculously easy
to make and even easier to EAT!!

Take some mini chocolate or powdered donuts and simply cut them in half.


Take some cake frosting/icing and some red and green food coloring and stir in several
drops of food coloring getting it to the colors you want it.
After your festive icing is ready--- take a small spoon and smear the icing
on the bottom half of the mini donut.


Zestfully, Let's Cultivate Food

Snow man Pizza


What does December make you think of?  All the lights? The possible snow? The candy, cookies,
and hot chocolate?  With all the festive gatherings and events it's easy to get swept up in the
crazy hustle and  bustle of the Chanukah & Christmas season.  I wanted to make something
that was winter related to something that is everyday food. What better than a snow man pizza!
I made mine a snow man margherita pizza but you can make it with any topping you want and like!
Take some pizza dough (often in the deli section if you want already made dough) or the dry packages
where you just add water is often found in the baking aisle of the supermarket.


One your dough is rolled out and ready--- simply divide it into 3 balls; representing the
snow balls of the snow man.


After you roll out the 3 circles of dough, you want to get your  pizza toppings ready.
I used salad tomatoes, basil, fresh mozzarella balls and a small can of tomato sauce.


Then comes the fun part! The decorating! Having some black olives would of probably
 helped in looking more like a snow man.


So my snow man is a little more abstract than I initially wanted but none the less....
the pizza was good!  It baked for about 15 minutes on 400 degrees.


Zestfully, Let's Cultivate Food

December 17, 2012

Sharing Christmas Cookies

I just wanted to share some pictures of Christmas cookies.
I don't make cookies too often because I'm not much of a cookie fan.
I decided to make a few with my mom for students in my
ESL class that I volunteer at on Tuesday nights.

My dad decided to join in and decorate some as well.
Being that my dad isn't the craftiest person... it was pretty cool to see him decorate some!


November 30, 2012

Let's Cultivate Food VIDEO

Click to watch the video ----> Cooking classes-- in your home but in the WILD too?  haha!

Thanks Jamie for the great video!
The video is a 2 thumbs up, it cracks me up and is really awesome!


November 24, 2012

Cooking CLASSES in your home!!!

Hands fully-on Cooking Class 
right in YOUR home or work place!
by a former restaurant consultant, food blogger, 
flavor creating goddess & former co-owner of a restaurant


“Let's Cultivate Food” is offering a fun approach to 
learning exotic cooking -- from the drinks, to appetizers
to the main entree in the comfort of YOUR home!        
The classes are fun with tons of tips and tricks along with 
learning hands-on ......  one-on-one tutorials....LIVE!


How does it work?
1. First, fill out some basic info on the link
    "To BOOKwith the # of people in your group,
    which menu and your location etc...  
    

2. Once a day and time is scheduled---
    My sous chef and I will come to your location 
    with the fresh ingredients. 
    We do all the shopping for you- and often it's
    multiple shops / markets---   
    (but we'll use your pots, pans, cutting board etc... 
    you know-  so you can simply re-create 
    the menu at another time down the road)

3. We’ll teach & you’ll help cook the exotic feast together – 
    then the best part, 

4.  EAT!

5.  To make the fairy-tale complete, while you and your 
      friends/family are discussing  who’s now the best with 
      making these dishes,  we’ll be cleaning and getting 
      the place back to sparkling clean!


So you ask, “What does it cost?"
Great question!  The prices for an In-Home Cooking Class are: 
$300 (up to 4 people) and $75.00 per additional person  
(see below of extended zip codes) 

The price includes ALL the fresh ingredients, 
the instructional class and for us driving to you!

Each person will be participating during the class along with 
getting their hands-on learning;  learning things some of your 
local restaurants don’t even know (or don’t want to tell). 
Again, we'll bring ALL of the fresh ingredients and 
hey let’s face it,  there’s a price to pay for sitting at home  
while we shop for the groceries  (often at multiple stores),  
drive to you and put on a  “live cooking show type presentation”,   
clean up and then have to drive home,   while you get to 
spend about 2 hours feeling like a rock star!!  


Can I invite others and if so...
how many people can I invite?
You betcha! The sweet spot is 4-6 adults, though you can 
go as small or as large as you want. 
The number of people however, should be limited to 
what can comfortably fit in your kitchen or dining area 
giving enough space to do what we’re here to do..
I think you know what I mean...


What should I wear?
Whatever you have that brings out your creative cooking juices. 
We’ll bring the aprons for each paying person to 
borrow while cooking!


Who does the cleaning afterwards?
We do! Though........... we promise not to complain
if you want to help!


When and how do I pay?
The methods of payment can be through-
~ Venmo
~ Paypal  
~ Credit card  (3.5% electronic fee)
~ Cash
(payment needs to be prior to the arrival of class)
(If you prefer to pay by cash--- it is due at the start of class)


What if I don't like any of the 
menu choices posted here but 
would like some cooking instruction 
anyway?
Simply choose "custom" on the form and enter the dishes, 
ethnic type or ingredient, etc. you are interested in learning 
and as long as it fits within my skill set I will be super excited 
to create a personal menu for you!  
I've mastered many things over the years of  teaching 
cooking classes and catering events... 
so I’m well prepared if you choose to take this route!


extra travel fee for the following zip codes -
due to the extra time travel based off of location,
time & consistent traffic (not random traffic--
city traffic is from data collected with over
150 classes in the city and these zip codes)
$25.00 extra travel fee to:

19103, 19104,  19105,  19106,  19107,
19121,  19123,  19125,  19130,   19134,
19145,  19146,  19147,  19148,

18912, 18938, 18940,  18944,
18951, 18964,  18966,  18969,  
New Jersey & Delaware


November 20, 2012

Swiss Chard Banchan


This super healthy side dish is very easy to make and delicious to eat!
It's basically a new staple "banchan" aka: Korean side dish that has made it in my house.
Often the veggie side dishes "banchan" are the typical spinach, sprouts or fern root.


Swiss Chard comes in bright rainbow-like colors. All you have to do is wash the leaves and let them
sit in some hot water on the pot to get them to soften up a bit.


Once they have been in a pot of hot water on the stove for about 10 minutes,
simply drain the water (or I often save and use the water from veggies as a base for soup stock)
and rinse with some cold water just so your fingers don't get burnt.  As you have some cold
water on them... you can tear the leaves a part very easily. You could also cut them with a knife
but when you tear them by hand--- it looks much more home-made and natural...
if you know what I mean. The last step in to add a small drizzle of sesame oil (about 1 TBSP)
and saute the ripped apart swiss chard strands just so they are completely softened. (about 10 minutes)


Lastly, just sprinkle some toasted sesame seeds on top and plate! What is your favorite
vegetable side dish?  What do you usually eat it with?  This banchan would be great to add
to bibimbap as well!

Zestfully, Let's Cultivate Food

November 13, 2012

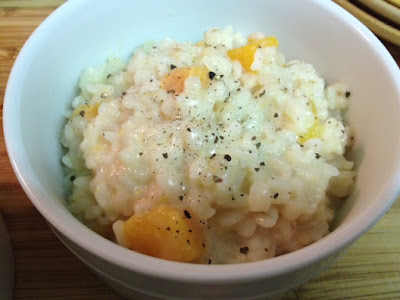
Butternut Squash Rice & Barley Risotto

I saw butternut squash the other day in the supermarket and never having
really cooked with it before... I decided I wanted to make some butternut squash
rice and barley risotto. I started by cutting the squash into small little cubes.
I took 1 cup of  rice and barley (about 3/4 cup long grain sticky rice rather
than the typical arborio rice for risotto and 1/4 cup of flat barley)
I used 2 cups of chicken stock and simmered the rice/barley mixture
for a good 25-30 minutes while adding the butternut squash
around minute 15 or so...


You'll need to stir fairly constantly and definitely keep your eye on this one.
After 35 minutes or so- when the rice/barley is cooked all the way---
add some salt and 1/4 cup of heavy cream (butter-optional)
That's pretty much all I did to this butternut squash rice and barley risotto.
I added some fresh cracked black pepper at the end.
It actually tasted pretty good for having made this dish for the first time.
It was great eating this side dish with some blackened chicken!


Zestfully, Let's Cultivate Food

November 9, 2012

Clam Chowder

I've been on a soup kick lately....probably due to the chilly weather.
I always enjoy the fact that here in Philly, we have 4 distinctly different seasons that
we can enjoy, BUT! with that said- the Spring and Fall season always fall short.
Summer is super hot and long, winter in super freezing for a solid 4 or so months but
the Fall and Spring always seem to be only barely a month long... as far as temperature.

What's your favorite season?
I'm usually a person who has no favorites (yeah, I'm one of those)
but I think I do enjoy Fall- at least the beginning of it- that time of year when
you first put socks on again from not wearing them since May due to wearing
flip flops and sandals all summer. The air is crisp and slightly brisk but not yet freezing
cold and it's the start of the leaves changing colors... an amazing part of nature that God has given us.


So, this time I made some clam chowder. New England style.
Did you know there are many different styles of clam chowder?
Yeah, you probably know about the Manhattan (red) and New England style...
but there is also the Rhode Island chowder, the New Jersey chowder,
the Delaware chowder, the Hatteras chowder and the Minorcan chowder.

Let me simply break it down...
New England - milk or cream based with potatoes, onion and clams,
             commonly eaten with oyster crackers.

Manhattan - clear broth with tomatoes to give flavor/color...
             started after 1930s and often eaten with clam cakes.

Rhode Island chowder - clear broth called "South County Style" referring to the southern beach/fishing
            area it originated in. RI chowder has potatoes, onions and bacon.

New Jersey clam chowder - bacon, onion, clams, potatoes, celery powder and Old Bay,
           light cream, asparagus and tomatoes cut and garnished on top.

Delaware chowder - consists of salted pork that is pre-fried, potatoes, onions, butter and
         quahogs (hard shelled clams) most similar to the New England clam chowder

Hatteras chowder -  This chowder is served throughout the
         OBX (North Carolina's Outer Banks region.
         clear broth, bacon, potatoes, onions, and flour as a thickening agent...often seasoned heavily
         with black pepper as a seasoning garnish, often having chopped scallions on top as well

Minorcan clam chowder - a spicy version using the clearer tomato broth with "secret ingredient"
         not so much secret anymore... a Spanish hot peer called datil (similar to habanero)


I started yes, with the good ole American bacon. About 4 strips and chopped them up.


I also diced up 1 large potato. I took the end (slightly rounded) pieces and cut them
into even smaller pieces so that it would help thicken my soup as the potato cooked down.
(pieces to the right--- in the picture below) 
I also diced one onion as well. I first fried the bacon pieces...
once they became crispy, I added the onions into the bacon and bacon fat mixture in the pot.

I added the potatoes once the onions were a translucent color... cooked all the way!
Yes, I took the easy way and used clams from a can rather than going to the seafood section
and buying them fresh which would definitely have a stronger and better taste.


Once the potatoes cooked through and became soft, I then added a a cup of heavy cream
and about a 1/4 cup of milk. I let everything come to a boil and then chopped some parsley
for a garnish and enjoyed the hearty soup with a side of crackers!


  • Ingredients: 
  • 1 large can of clams or a bag or fresh clams (fresh recommended)
  • 1 large potato (Idaho works well)
  • 1 onion diced
  • 1 cup cream (I used heavy)
  • 1/4 cup of milk
  • 4-5 strips of bacon cut into small pieces
  • parsley for garnish
  • crackers to enjoy with or a good crusty bread!


Zestfully, Let's Cultivate Food


November 5, 2012

Hot and Sour soup --- take-IN

I wanted to have some hot and sour soup the other night but didn't really want to
order just soup from a restaurant and didn't want to order a whole meal either---
so I figured I would try to make it at home and this is how it went.

I started with cutting the tofu into long strips and had them laying to the side 
to be thrown into the soup towards the end. 
I started with the sesame oil and grating the garlic, ginger and lemongrass into the pot.
Next, were the mushrooms cut julienne (strips).
I added chicken broth and let everything have a good ole time in the hot sauna.


After about 10-15 minutes when everything was nice and bubbly... I took 1 egg, carefully rinsed it
and took a chopstick, poked a hole into the side of the egg. 


Then, I shook the sucker--- I mean egg so that the egg would come out little by little as I shook it.
You'll have to give it strong little shakes but it's worth the tip and trick in getting it-
to come out in little stream like pieces!


Once, you are done with the egg, you can add your already cut strips of tofu. Now would
be the time to add your scallion as well...towards the end because it doesn't really 
need to cook too much. I would save a few little pieces of scallion so you can use it as a garnish!
See how the egg is in little itty, bitty pieces?


Here is Hot and Soup soup take-IN rather than take-out. 


If you don't like too much scallion, you can use a smaller amount to garnish!
If you have little Chinese spoons.... now would be a perfect time to use them.


I hope you enjoy making and slurping your take-in hot and sour soup!
If you take a taste and your soup broth isn't as hot and sour... literally...
add more hot pepper paste or simply siracha sauce as another option to bring the "hot" out
and a splash or 2 more of vinegar for the soup aspect.


  • Ingredients:
  • 1/2 a pack of tofu (the firmer the better for this soup)
  • a handful of shiitake mushrooms (about 1/4 cup)
  • an inch of grated ginger (about 2 TBSP)
  • 2 garlic cloves grated
  • 1 teaspoon of sesame oil
  • 1 inch of grated lemon grass or 1.5 teaspoon of lemongrass paste
  • equal parts of soy sauce and rice vinegar (I filled 3 ladles full) 
  • (I would start with 1/8 cup if you are keen on exact measurements)
  • 1 TBSP of red pepper paste
  • 1 egg shaken
  • 2 TBSP of cornstarch mixture (for thickening)
  • 2-3 scallions (whole-green and white parts)
  • 1 cup of veggie or chicken broth. (water as a substitute is ok also)


  • Zestfully, Let's Cultivate Food

    November 4, 2012

    Philadelphia Chutney Company

    When I hear chutney.....
    I think of mango chutney that I can put on a samosa... basically an Indian dumpling.

    I had the pleasure of eating at the Philadelphia Chutney Company the other night.


    Chutney is located on 1628 Sansom Street in Philadelphia.
    Many places outside of the US (unfortunately) have Indian fast food,  a concept we
    might not be too familiar with. The Philadelphia Chutney Company says ".... in the states, our
    take-out options are restricted to only Mexican, Chinese, pizza or burger joints.
    The Philadelphia Chutney Company is looking to change that and bring Philly up to speed."

    and this is what they do! Their food is southern Indian fusion and crazy good partly due to
    using food that is organically sourced and having a menu that is health-conscious.

    I ordered a "Dosa with a modern twist". I ordered the chicken with option #7 which had
    avocados, diced tomatoes, arugula and shredded cheese.


    A Dosa is bascially an extra large, thin crepe like wrap where all the delicious flavors are in the middle
    like a modern burrito... sort of but better!  You're given different sauces to enjoy with your food as well.
    The picture below is of 2 Kati rolls.....Chicken Tikka.  You could call them an Indian burrito I guess.


    The bottom roll like wrap is the extra large crepe type wrap... I'm not kidding when I say it is extra-large.
    They also have some cool drinks you can choose from as well. Ginger ale is always a favorite!


    If you are in the city of Philadelphia, Philadelphia Chutney Company is definitely worth stopping by 
    and grabbing some food from.... you will not be disappointed!  It's really delicious Indian Fusion. 
    You can check out their menu or for more info at   www.philadelphiachutneyco.com

    Have you ever heard of or had the opportunity to stop by Philadelphia Chutney Company...?
    Or better yet, have you ever had Indian food and if so, feel free to leave me a comment 
    about your favorite Indian dish!

    Zestfully, Let's Cultivate Food