February 12, 2012

Warm Potato Salad with Green Beans

Summer and Fall time calls for picnics with chilled potato salads but with the season
being winter and having snow on the ground makes for warmer salads.

Here is a recipe for warm potato salad with green beans.

Recipe:
1 small bag of fingerling potatoes
1 small bag or 1 handful of string or green beans (fresh, not frozen or canned)
2-4 eggs (depending on # of people)
1 TBSP on grainy dijon mustard
1 inch of anchovy paste (optional) gives excellent nutty flavor
1 large garlic clove (grated)
1/4 cup white vinegar & water
handful of shredded or grated parmesan cheese (about 3-4 TBSP)
optional (hand torn rotisserie style chicken)

First, start with boiling some eggs.  Here's a no fail way to boil eggs-
Take you eggs and gently lay them in a pot and then fill your pot with COLD water,
enough that the eggs are completely submerged.
Without putting a lid on it, wait until the water starts to boil profusely.
When the water is boiling to the point of bubbling, turn your stove off and THEN place a
lid on the eggs and wait 10 minutes. (not five minutes, not 6 or 7 either)
After 10 minutes, drain/pour the water out and run COLD water over the eggs for
many, many seconds and then let the eggs sit in the cold water for a few minutes or until
you are ready to peel them. If you really need hard boiled eggs for something asap...
laying them in a bowl of ice and water will help tremendously. The cold water shocks the
egg and allows the shell to pull away from the egg itself making the peeling process way easier.


(sometimes it's better to put a little more water since the water evaporates- 
unlike mine in this picture as you can see the eggs are not completely covered)


Yes, I'm aware that lid is bigger than the pot. I'm always multi-tasking
so it's usually whatever I can grab that works!


Next, get your fingerling potatoes ready, they are called fingerling because they look like
fingers. You can obviously use any type of potato but I recommend a smaller type since this
is potato salad vs. just a baked potato. After the potatoes are washed, just boil them.


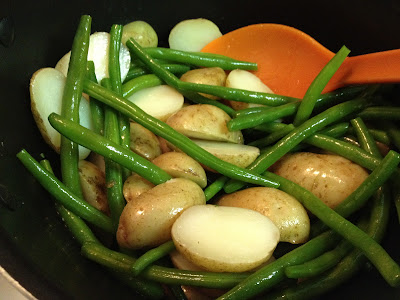
As the potatoes are boiling away wash and cut the end stems off of your green/string beans.


Once you've checked with a toothpick to see if your potatoes are soft...
you can literally just throw the green beans in on top of the potatoes.
Place a lid on it and you can turn the stove off.
The hot, boiling water that has accumulated from the potatoes will cook out the beans.


The dressing for this potato salad is...
1 TBSP on grainy dijon mustard,  1 inch of anchovy paste (optional) gives excellent nutty flavor
and 1 large garlic clove (grated) (I had some roasted garlic so I decided to use that this time)
and equal parts of white vinegar and water (about 1/4 cup)


Anchovy paste comes in a user friendly tube where you can simply squeeze it and 
then throw it into the refrigerator.
Here's BEFORE:

 Here's AFTER:

If you want to make this warm potato salad more of a meal rather than a side,
you can always add something like rotisserie style chicken pulled apart.


 Take you perfectly boiled eggs and cut them in half.  


Cut your potatoes in half and throw into your pot or a mixing bowl.


 Add your cooked but slightly still having a crunch...green beans


 With your chicken if wanted...


 And a handful of the shredded or grated Parmesan cheese.


Add the dressing and toss together and enjoy!


It's ALWAYS about making it the way you like... so if you like nuts,
you can always add a handful of nuts or even craisins... whatever you enjoy!

February 10, 2012

Sweet Winter Slaw

After enjoying KFC coleslaw for many years, I figured out how to make yummy coleslaw at home
from scratch and while making it- I realized how much sugar goes into not just KFC but other restaurant
coleslaw recipes. I used only half of what the original recipe for sugar was, but it was not sweet at all
even with,  I think what was half a cup meaning the original recipe called for a full cup of sugar, wow!

I've cultivated the regular coleslaw that is still good but it's always about making it
slightly different than the norm, keeping it simple and most importantly yummy!
So here goes:

Recipe:
1/4 head of red cabbage
3 TBSP of maple syrup (or splenda)
2 TBSP of sesame oil
2 TBSP of soy sauce
1/4 cup of Balsamic vinegar
1 whole mango cut into slivers
1 hearty handful of cilantro
2 limes
pepper powder (about 1 TBSP) or to your liking
(my guess is that this will be enough for 3-5 people as a side dish)

I first started by cutting the red cabbage (yes, it's purple but they call it red cabbage) into slivers
and taking the cilantro and giving that a quick chop. (maybe cut about each inch of the cilantro stem)
 The purple hue mixed with the bright green hue is quite vibrant along with adding the golden mango slivers!


I took one lime and squeezed the juice into the raw cabbage, cilantro and mango mixture to add
some acid.  I used the juice of the 2nd lime with the rest of the sauce/marinade which is
3 TBSP of maple syrup or any sweetener, 2 TBSP of sesame oil, 2 TBSP of soy sauce,
1/4 cup of Balsamic vinegar and about 1 TBSP of pepper powder.
I like to use the Korean pepper powder rather than the pepper flakes or seeds that are way bigger and
harder to control the spice level. I also made the sauce/marinade in a separate bowl so I could taste it
before mixing it into the slaw. I also took a stem of lemongrass and grated that with my microplane grater.
I suppose you could leave the lemongrass out if you don't have access or feel like buying lemongrass.
The colors and flavors are very vibrant and delicious. I will honestly say this one is totally a
pay for restaurant quality dish!


Oh, and for all you cilantro haters out there... you can't taste the "cilantro-ness" in this slaw... I think
the sesame oil flavor over powers it and makes this Winter Slaw just plain old yummy!


It's not too difficult to make and this one's a 2 thumbs up! Vibrant and flavorful Sweet Winter Slaw.

February 8, 2012

Cube It, Shove It and Share It!

I guess you could say I like Buffalo Sauce. Here is a fun loaf that you can share with your vips,
you know,  your... very important peeps aka: friends and family.
This really easy recipe is ridiculously simple.

Recipe: 
1 loaf of good crusty bread, 
1/4-1/2 pound of sliced deli meat (your choice)
1 hearty handful of shredded cheese (your choice)
and a drizzle of olive oil


For the one I made, I got a 7 grain crusty bread, 1/4 pound of sliced chicken breast 
from the deli counter and shredded cheddar cheese. 


I took the chicken breast and chopped it up into small bite size pieces.
I took the loaf of crusty bread and cut the bread into square pieces almost
like a grid with a paring knife. Right about now is when 
you should preheat your oven to about 350 degrees.


Some of the squares might fall out on you... but who cares! right?
I made quick buffalo sauce with about an inch of butter melted in the pan and Frank's Hot Sauce.
I mixed the Buffalo sauce with the chicken breast. I took a spoon and literally shoved the chicken
pieces into each crevice of the loaf of bread. I added a drizzle of olive oil and then topped it with
a heavy handful of shredded cheddar cheese.


Pop the loaf into the oven for about 8-10 minutes or until the cheese melts. You can turn the
oven to broil for the last 5 minutes or so if you want your cheese to get really crusty and almost burnt.


This recipe was adapted from Rachael Ray's Cheese Steak Loaf. This loaf is a great appetizer
to obviously be shared... and great with Blue Moon and of course an orange wedge!

February 6, 2012

PAN...what? I mean KO

Panko.  Most of us know that Panko is a Japanese bread crumb especially since it is now on every real
and not so real reality type of cooking show. I just wanted to add my two sense in there by saying that
the meaning of panko comes from the Japanese word pan meaning bread and ko meaning crumb.

The most common type of bread crumbs come from old bread being pulverized
in a food processor or blender.  Panko is sort of the same thing except the fact that they are
not pulverized as much and they are always made from bread without the crust which allows the
food being used with panko to be crispier especially because the individual bread crumbs are
larger than regular bread crumbs.


February 1, 2012

Strawberry Lemonade Margarita Jello Shooters

Strawberry Lemonade Jello Shooters


When it's 63 degrees on February 1st... you never know what you might make to eat or snack on!
These are jello shooters with a little more fun and creativity rather than the old boring shot glass.
Simply get some strawberries- the larger the better for these.
There are only a few simple steps to make these strawberry lemonade jello shooters.


All you have to do is take a paring knife and cut the bottom of the strawberry so it can lay flat.
Then take a small spoon or better yet- take the paring knife and cut a little circle on the top of the
strawberry and spoon out the center of the berry. Once the center of the berries are hollowed out-
you can lay the strawberries in a mini muffin tin if you have one- otherwise because the bottoms are flat
they can just lay on a small plate (depending on how many you are making)


Then take your lemon or strawberry jello mix  (1 cup HOT water with the jello mix,
followed by 1 cup cold water) and spoon or ladle in the jello.


Once it's been in the refrigerator for at least 2-3 hours - you can see that the jello
is not liquid anymore. You can  brush or turn over and dip the top and edge with a little
lime juice to add the salt for the margarita effect and by adding tequila or vodka to the jello!


A little teeny weeny wedge of lime is also a cute and tasty garnish.
You can also just cut the rind part off and eat the lime in one shot!
Cheers Apr-uary!  (February weather being 63 degrees = Apr-uary)

January 27, 2012

Not Lasagna, Not Cannoli, Just Healthy YUM

Let's Cultivate Food. Let's enjoy more veggies!
Ever since I was little, I never enjoyed eggplants, mushrooms and liver.
As an adult, I love mushrooms: button, shiitake, porcini, oyster, enoki, wooden ear, you name it.
I still cringe at the thought and taste of liver though. I recently discovered Kale, Swiss Chard
and eggplant. I made these... um, I guess I would call them rolls. It's not really lasagna but
I guess maybe a veggie stuffed cannoli...?
Either way, whether you need to fake someone out to eat more vegetables or you simply enjoy healthy and delicious veggies- this dish is for you to try. It's great because it is so hearty that you almost think there is some ground beef or some meat in there.


The veggies that went into the filling of these rolls were: mushrooms, bell peppers, onions, spinach, artichoke and ricotta cheese to combine them all together. You will also need a little tomato sauce and your favorite shredded cheese to top at the end. I took a handful of mushrooms and diced them up small.


 I then did the same to about 1/4 of a yellow bell pepper. (You can use any kind of mushroom and any color pepper as well) I just happened to have a yellow one on hand.


 You also will need about 1/2 of a diced up medium sized onion.


 I also added artichoke pieces that are marinated in olive oil from the jar.
(I gave these a quick chop)


Artichoke and spinach go hand in hand especially in many dips... so it made sense and makes it even healthier by adding some bright fresh green into the mix. Give the spinach a quick chop also!


Then it's the roll/skin part of the roll. You are basically using the eggplant in place of pasta
like you would if you were making lasagna. After washing the eggplant, carefully hand cut
or use your mandoline to cut thin slices of the eggplant.


You want to do a quick fry of the eggplant slices and you can simply do that by adding
a little olive oil into your pan and cook the eggplant on both sides so they the pieces
are a little more pliable and it wont take as long in the oven.


 Take all the diced up veggies and toss them in a little olive oil in the frying pan as well.
Once the veggies are cooked about half way or so...
you can turn the stove off and fold in your ricotta cheese.


 Take the filling and lay it on your slice of eggplant and simply roll.


 I laid the veggie stuffed eggplant rolls on an oven pan on tomato sauce.
Once all the eggplant cannoli rolls were on the oven pan- I drizzled a little olive oil,
piled some shredded mozz. and cheddar cheese on top and threw the pan into the oven
for about 30 minutes on broil with the oven door once again, propped.


Once the cheese is melted and starts browning a little with a little crusty texture...
your rolls are done!


Healthy YUM!  As we ate this, we didn't say "where's the beef?"